Tuesday, June 17, 2014

Stencil Play~June 17

Hello!

Hope Summer is going well for everyone so far! As always seems to go by too fast, hahaha!

Had some time to play with some stencils and paint today. I made this postcard, it is about 4"x5". I made it with the Simon Says Stamp, Wednesday challenge in mind, the theme, STENCIL IT. I used the Crafter's Workshop Mini Gears stencil, Distress Paint and tissue.

Below are a couple of photos, click to see each one a bit bigger:) Thanks for looking! I really am happy you stopped by today!!

This is the complete postcard. I love the texture the tissue stamped and stenciled images add to the project. The base paper was embossed then colored with Dylusions spray to highlight the raised portions.


I stenciled the mini gears onto tissue paper using black archival ink. Once dry, and it dries quick!, I used distress paint on the non-stick craft mat and dipped the stencil and stamped tissue into it.


After everything was dry, I tore apart pieces and started layering! I love how each layer melts into the previous one. The archival ink does not run or smear when wet. The distress paint stays clean and clear too. The Dylusions spray inks do run when re-wetted with the gel medium I used in layering. But that effect I like as well, I just get my fingers inky and pasty and push it all around, the color bleed is really nice so it's all good:)

Thanks again and make sure to check out all the awesome projects at Simon Says Stamp, Wednesday Challenge.


Sunday, June 15, 2014

Journal Paint Play~June 15

Yay! Another fast posting!

Banner images courtesy my son, Dylan<3


A simple page in my homemade art journal, playing with paint, stamping and texture.


I prepared the page with a layer of gesso. While it was still wet, I pressed some dry embossed paper strips into the gesso to leave some fun dents. This part was actually done awhile ago, I prepped some pages to be ready when I felt like (more like had time to) playing.


I am still exploring stamping on tissue, then tearing the tissue stamped images apart before layering them onto the pages. To attach the tissue to the page I used water diluted gel medium. I stamped the black images with archival ink. The pink celery roses and blue circle stamps used distress paint.


This corner I used the distress paint marbling technique. I really love the layers of texture this added along with the more opaque quality. I am going to get more painty with this particular process, it is soooo fun:)


More detail of the celery roses and blue circle stamps stamped with distress paint.


This corner is used the stamped tissue that was colored with Dylusions ink sprays. They have a much more transparent quality. 


Thank you for looking! This is also linked to Simon Says Stamp, Monday Challenge: Paint

Flower Picture Play!~Sunday June 15

Quick bit of picture fun. Playing with the settings on my old pocket digital camera I was able to make this close up from a Yellow Brush Bush in my garden.

Simple fun, I really like the water droplets and the sparkle! Click each image for better view.


This image was processed in Photoshop Elements with a couple of filters to darken it a bit then layered with a texture made by Kim Klassen, kk_waterfront18. This photo is also linked to Texture Tuesdays.


This is the same photo. I just cropped it so it would be more off center. It is pretty much straight out of the camera other than the cropping and texture. This gorgeous texture is made by Bonnie at Pixel Dust Photo Art, called Light Source. I just love the texture she made. It is gorgeous on its own. See it for yourself, here.


Have a fun day and thanks for stopping by!
~kim

Thursday, June 5, 2014

CC3 Challenge #3 ~Faux Tea Rose~Let Your Dreams Fly~June 5 2014

Greetings! I hope you are having a lovely day this day:)

It has been just about two weeks already since the last project in the Tim Holtz, "Compendium of Curiosities Volume 3" Challenge hosted by the wonderful Linda Ledbetter! Do take a look there at all the amazing projects and beautiful blog. Best part is, you can join the challenge any time! Just order your own copy of the guidebook from Tim Holtz here and he will autograph it for you, too!! Then follow the prompts which are posted each two weeks til we make our way through them all. I'm learning tons already!

This is an odd numbered challenge, so it is sponsored by the Inspiration Emporium and they are offering a $50 Gift Certificate to a  random lucky entrant! So cool and generous, thank you!! There is also a super cool prize pack donated by Tim Holtz and Mario Rossi to be awarded by the Curiosity Crew!

For this challenge we had to use a specific die and transform it into a lovely rose. Don't worry, grab your copy of the book to see how! It was my first time trying this technique and after a couple of tries I think I got the hang of it. It is so fun!

Well, here I go! Below is my entry for the Faux Tea Rose Challenge sponsored by Inspiration Emporium. If you are curious, my supply list and process is below the pictures:)


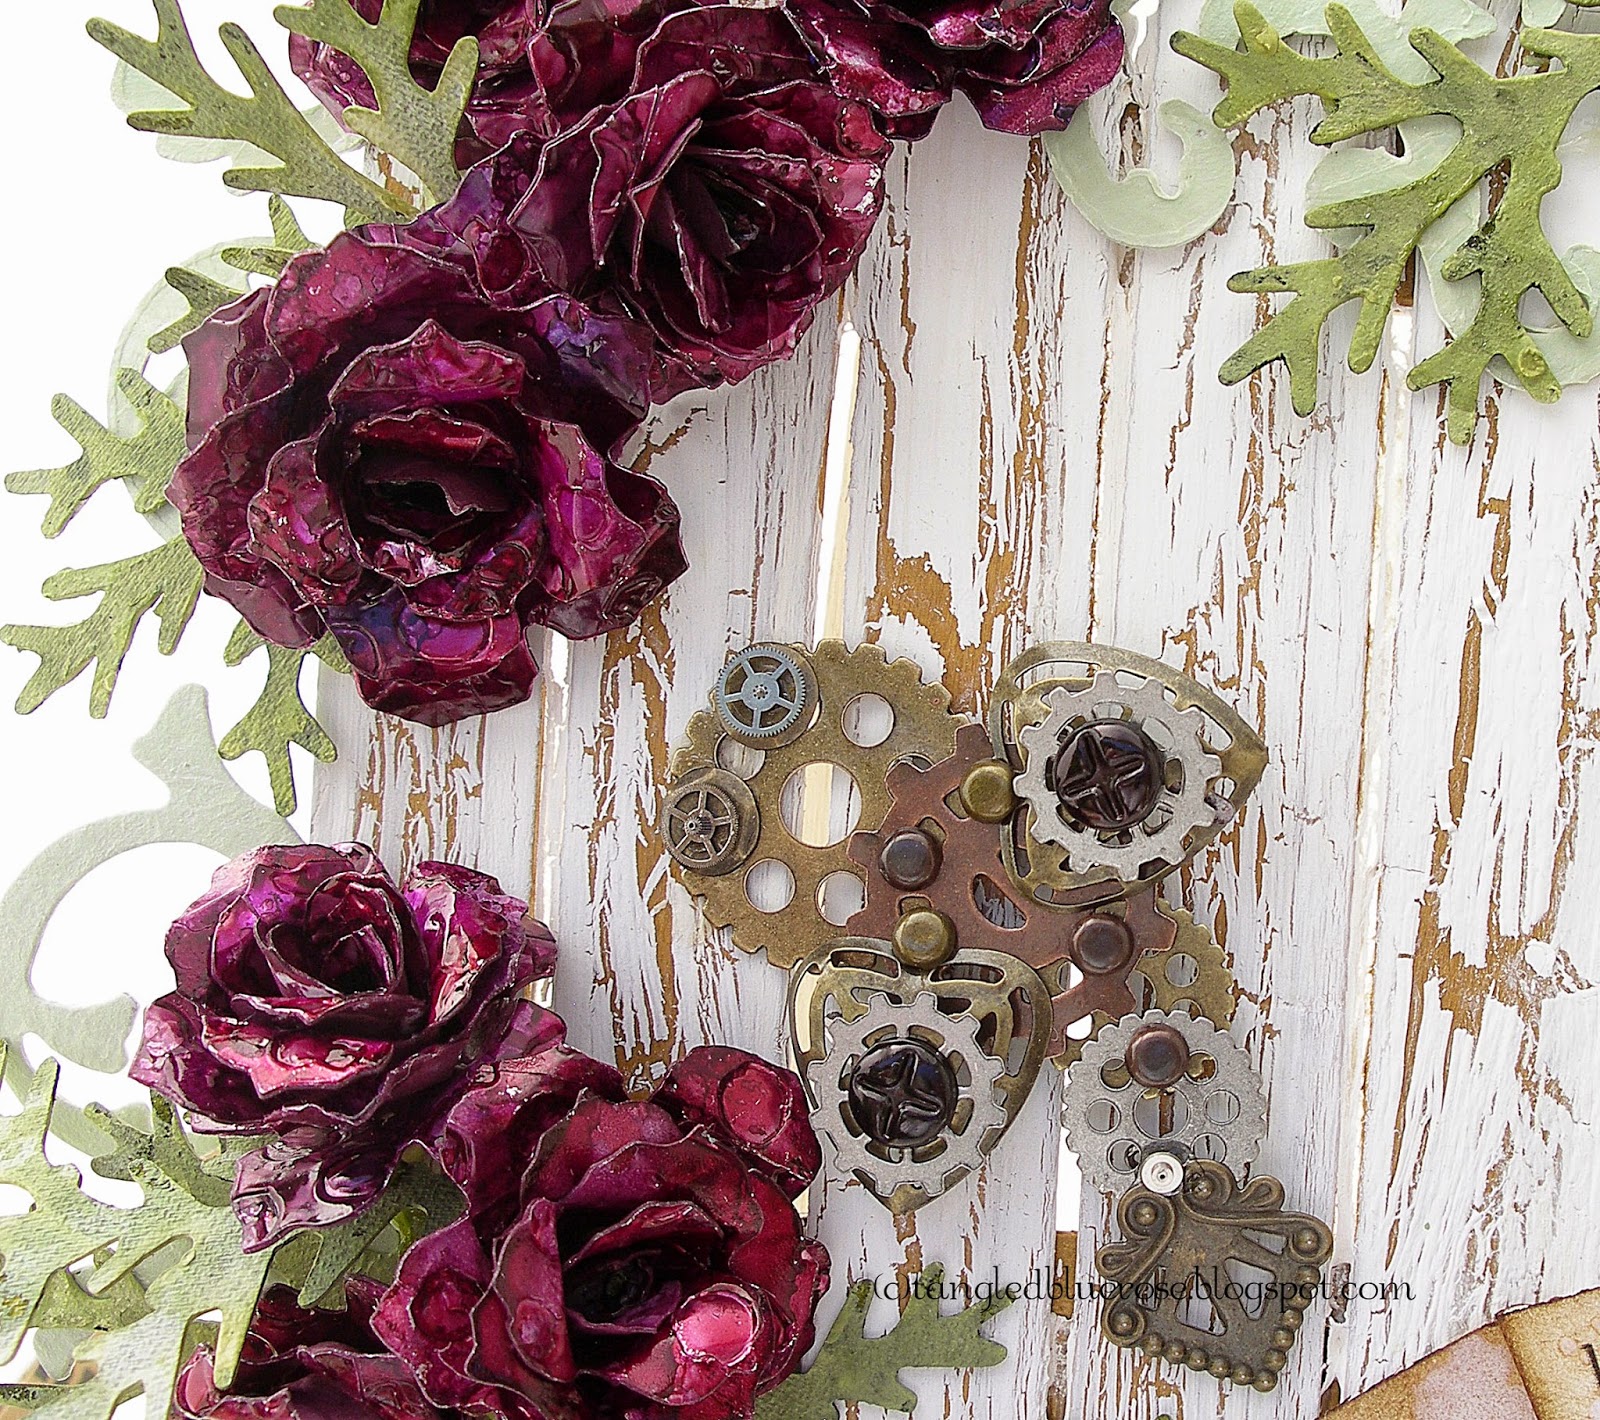
This is my project, "let your Dreams fly". The garden is such a fun and relaxing place to enjoy and seek inspiration! I have roses and garden critters with a twist:)


My roses were made with air conditioning foil tape bought at the hardware store. Gardens should sparkle right? I attached the tape to cardstock then die cut it. After that I embossed the cuts using the honeycomb and bubbles texture fades. I added alcohol inks to get the yummy deep color! I LOVE the foil tape and inks, they are so far among my favorite 'stuffs' to play with:)


Next my magical buggies! My next favorites, gears and cogs, no wonder I love all things Holtz, right :) !! The mini fasteners work great here too, so many uses.


My lovely dragonfly checking things out! The rose vine is painted with distress paint on top of gesso, I wanted a grainy distressed look. The fern-like leaves are also gesso covered then painted with Distress Stain, again the get the fading and brights all at the same time. Everything is mounted on my self made 'fence': constructed from popsicle sticks with more distress, can't have too much distress!

I really love how the roses change color depending on the angle of view. It is a fantastic quality in the foil tape and alcohol inks.

Steampunk roses and buggies, a wonderful place to let your dreams fly.

Please leave me a word (or three) on what you think:)


Entered/Linked into the:
CC3 Challenge 3 Faux Tea Roses

The piece also works well for the wonderfully open challenge held at Simon Says Stamp: Monday "Magic" theme.
SimonSaysStamp Monday Challenge: Magic, Alcohol Inks on metal, magical<3 Gear & Cog Buggies<333

Sunday, June 1, 2014

June 1~Stamping Play~Postcard Purple Rose

Greetings this fine Sunday, June 1!

A new project today, dried, finished and photographed and ready to share. Today's permission to play project is stamping. In response to SimonSaysStamp Monday challenge, The Artsy Stamp, I made this postcard below. The focus was stamps and texture. I gathered my stamps and had tons of fun!

This is what I made, a postcard sized piece about 3.5 inches by 5.5 inches. Below the photos are my steps if you are curious :) I hope you like it, please leave any comments below.


I started by attaching some foil tape to some heavy paper. Then I embossed the paper using the Sizzix Doily & Roses embossing folder. That done, I set it aside.

I have seen a lot of wonderful creations made by stamping onto tissue paper and it looked soooo fun! So, using some cheap tissue paper from the dollar store, Ranger Archival Ink, Black, and Tim Holtz SA stamps, I  began stamping away!

Stamping on tissue is so much fun and super addictive! So relieved the tissue is cheap! The next sheet I made by spraying the tissue with Dylusions spray inks. While that page was wet I put a fresh clean sheet on top to use up some of the excess ink, way too gorgeous to waste! Set those aside then let them dry.

Once everything was dry, time to get going! I tore the stamped images apart and some of the Dylusions colored paper too. I layered the stamped images down first using gel medium which dries clear. I let that stage dry.

To add some color to this project which was black and white so far, I added in the Dylusions stained tissue. The colors are so intense. Even when dry, Dylusions is water reactive. It worked out well, as I was adding the pieces on top of the previous layer, the ink came up a bit. I smooshed around the lightly tinted gel over the edges and around. I think it made a great fade!

To bring up the texture I made, I applied some Archival ink to the ink blending tool and lightly brushed across the surface. Then around the edges of the card to frame it.

For a bit of sparkle I added some random bits of distress glitter.

Have a wonderful day and thank you for stopping by:)

Linking to SSS, Monday challenge.